Sunday, October 30, 2011

Veggie Dip


In developing this recipe, I was inspired by Debbie Does Dinner. I love the idea of a low-calorie and low-fat veggie dip. It makes sense, doesn't it? If I'm going muster up the strength to bypass the cookies and snack on some carrot sticks, I don't want to ruin the effort with an unhealthy dip.

This dip uses Greek yogurt as its base, which has a similar taste and texture to sour cream but sports a much friendlier nutrition label. One batch of this recipe contains roughly 75 calories and 4 grams of fat, and makes enough to share with a couple of friends.


VEGGIE DIP

1/3 c fat-free Greek yogurt
1 tbsp light mayonnaise
1/4 tsp seasoned salt
1/4 tsp dried dill weed
1/2 tsp freeze dried chives
1/8 tsp onion powder

1. Mix all ingredients together in a small bowl. Enjoy with cut veggies.

This recipe is shared with Melt in Your Mouth Monday, Craft-O-Maniac, On the Menu Monday, Recipe Sharing Monday, Made by You Monday, Tuesday Talent Show, This Chick Cooks, Full Plate Thursday, It's a Keeper, Foodie Friday, Sweet Tooth Friday, Sweets for a Saturday

Friday, October 28, 2011

Pinterest Favorites Friday

I find Pinterest a very useful tool in my mission to procrastinate from housework as much as possible. It's also a wonderful place find recipes and craft ideas. Today, I thought I'd share some of my favorite finds:


I love this tip from All Things Homie on how to make breakfast sandwiches for a crowd. Isn't this ingenious? This would be great to try over the holidays, or whenever you have a house filled with guests.


What a neat idea from Picky Palate! This would be fun to do with left-over scraps when making holiday pies. Kids would go crazy for these. So would I, for that matter. Then again, I am still at least 87% kid.


Mashed potatoes and pies are great, but for those of us who don't want to completely bust our waist lines, this yummy looking chicken and tomato pasta dish from Skinny Taste would be a nice reprieve from all the heavy holiday cooking.


These diy reusable bowl covers from The Farm Chicks are just brilliant. Sometimes I get tired of wrestling with plastic wrap. And the sewing instructions are simple enough that even I can make these. I think.


Ok, so this has nothing to do with food. But it's penguins wearing sweaters! You can read more about why New Zealand penguins are rocking these life-saving duds over at Fashionista. I knit and would be seriously tempted to make a bunch of these, but apparently the penguins' closets have already been filled.

Wednesday, October 26, 2011

Pumpkin Gingersnap Cookies


These cookies combine two great fall-appropriate flavors: pumpkin and ginger. Gingersnap fans will love these. Pumpkin lovers will be happy as well. You can't go wrong with a classic cookie like this. My taste testers agree. I sent a box of these off to work with my husband, and the box came back with nary a crumb.


PUMPKIN GINGERSNAP COOKIES

2 1/3 c all-purpose flour
2 tsp baking soda
2 tsp cinnamon
1 1/2 tsp ground ginger
1 tsp ground cloves
1/2 tsp salt
1/2 c (1 stick) unsalted butter, softened
1 c sugar (plus more for rolling cookies)
1/2 c canned pumpkin
1/4 c molasses
1 egg
1 tsp vanilla extract

1. Sift together flour, baking soda, cinnamon, ginger, cloves, and salt. Set aside.

2. Using an electric mixer, cream together butter and sugar until light and fluffy. Beat in the pumpkin, molasses, egg and vanilla extract. Add in dry ingredients and mix until just combined. Cover bowl with plastic wrap and refrigerate dough for at least an hour.

3. Preheat oven to 350 degrees. Line cookie sheets with parchment paper.

4. Roll dough into 1-inch balls and coat each ball with sugar. Place on lined cookie sheets. Bake for 10-12 minutes, or until tops of cookies crack. Allow cookies to cool on sheet for a minute or two before transferring to a wire rack to finish cooling.

Source: Two Peas and Their Pod

This recipe is shared with Melt in Your Mouth Monday, Craft-O-Maniac, On the Menu Monday, Recipe Sharing Monday, Made by You Monday, Tuesday Talent Show, This Chick Cooks, Full Plate Thursday, It's a Keeper, Foodie Friday, Sweet Tooth Friday, Sweets for a Saturday

Monday, October 24, 2011

French Onion Soup


French onion soup has always been a favorite of mine. It's the perfect dish for fall. Warm, comforting and rich.

When making this, you might feel like you're slicing an insane amount of onion. I use a 6-quart stockpot when preparing this recipe, and the onions nearly fill it to the top. However, a half hour of careful care and steady heat reduces them to just enough to cover the bottom of the pot. It's almost magic. I always make a point of cooking the onions a tad more than I think I should. Short of blasting the heat, it's hard to overdo the onions, but it's very easy to underdo them. No one wants crunchy onions in their soup. Trust me.

The biggest change I made to the original recipe was leaving out the red wine. I never have it on hand, and it's too expensive to justify buying just for soup. Plus, I don't like it. While the recipe calls for vidalia and red onion, feel free to use any jumbo yellow onion in their place (often the yellow onions are the cheapest).


FRENCH ONION SOUP

4 tbsp butter
1 tsp salt
2 large red onions, thinly sliced
2 large sweet onions, thinly sliced
3 15oz can chicken broth
1 15oz can beef broth
1 tbsp Worcestershire sauce
2 dried bay leaves
1 tbsp balsamic vinegar
8oz swiss cheese, shredded
1 baguette, store bought or make your own

1. In a large stock pot, melt butter over medium-high heat. Add in the onions and salt. Cook the onions, stirring often, for about 30 minutes, or until your onions are caramelized, dark golden brown in color, and syrupy.

2. Pour into the chicken broth and beef broth into the stock pot. Stir in the Worcestershire sauce. Season with a bit of pepper (unless you used a low sodium broth, you probably don't need to add salt). Add in the bay leaves. Scrape the bottom of the pot to loosen up any caramelized bits. Cover the pot and simmer on medium for about 20 minutes.

3. Fish bay leaves from pot and stir in balsamic vinegar. Place a piece of baguette in each soup bowl (you can get 6-10 servings from this recipe). Ladle soup over bread and then top with some of the cheese. Heat bowls under the broiler until the cheese bubbles and browns. Wait a minute or two for bowl to cool down some before serving.

Source: allrecipes

This recipe is shared with Melt in Your Mouth Monday, Craft-O-Maniac, On the Menu Monday, Recipe Sharing Monday, Made by You Monday, Tuesday Talent Show, This Chick Cooks, Full Plate Thursday, It's a Keeper, Foodie Friday, Sweet Tooth Friday, Sweets for a Saturday

Saturday, October 22, 2011

Cream Cheese Pound Cake


Don't let the modest name or appearance of this cake fool you. It's like crack baked into a bundt. It's moist and dense, and the cream cheese gives it a wonderful tang.

Traditionally, I haven't been a fan of pound cakes, or bundt cakes for that matter. But I'm beginning to see the beauty in their simplicity. I love how a bundt allows me to throw ingredients into one pan and be done with it. It's attractive enough and tasty enough to forgo the frosting. Also, there's something homey and retro about the bundt. It reminds me of a time when neighbors visited neighbors to gossip over coffee and cake. I don't even know my neighbors. Although maybe I would if I brought over some of this pound cake!


CREAM CHEESE POUND CAKE

1 1/2 c (3 sticks) unsalted butter, softened
1 8oz block cream cheese, softened
3 c sugar
6 eggs, at room temperature
3 c all-purpose flour
1/8 tsp salt
1 tbsp vanilla extract

1. Preheat oven to 300 degrees. Grease the insides of a 10-inch bundt cake pan.

2. Using an electric mixer, cream together the butter and cream cheese. Gradually beat in the sugar, frequently scraping down the sides of the bowl. Beat in the eggs one at a time. Add in flour and salt and mix just to combine. Mix in vanilla extract.

3. Pour batter into bundt pan. Bake in preheated oven for 1 hour 40 minutes, or until a toothpick comes out clean. Allow cake to cool in pan for 15 minutes before unmolding onto a wire rack.

Source: Elizabeth's Edible Experience

This recipe is shared with Melt in Your Mouth Monday, Craft-O-Maniac, On the Menu Monday, Recipe Sharing Monday, Made by You Monday, Tuesday Talent Show, This Chick Cooks, Full Plate Thursday, Foodie Friday, Sweets for a Saturday

Thursday, October 20, 2011

Baked Mozzarella Sticks


Mozzarella sticks hold a dear place in my heart. They've been a favorite of mine ever since I remember. I allow myself to indulge in them as a treat every time I'm at a Sonic (which isn't often enough, because, sadly, the closest one is an hour's drive).

But as much as I love mozzarella sticks, I find the process of making them unappealing. Dip the cheese in flour, then egg, then breadcrumbs, then fry and watch the cheese ooze out into the oil. No thanks. It tends to make a mess of me and my kitchen, and it still does not taste as good as I can get from a pizza shop.

These baked mozzarella sticks change the game. They are not like any other mozzarella stick I've ever had. Instead of breadcrumbs, each cheese stick is tucked inside an egg roll wrapper and then baked. While different than a traditional mozzarella stick, these are just as tasty.


MOZZARELLA STICKS

12 egg roll wrappers
12 string cheese sticks
water
2 tsp extra-virgin olive oil

1. Preheat oven to 400 degrees. Line a baking sheet with foil and lightly coat with non-stick cooking spray.

2. Place an egg roll wrapper on a clean surface, with one of its points facing you. With a pastry brush dipped in water, moisten all the edges. Place a string cheese at the bottom point of the wrapper and start rolling. Tuck in the sides as you roll. Place seam down on the prepared baking sheet. Repeat for the rest of the egg roll wrappers.

3. Brush the tops of the sticks with the olive oil. Bake in preheated oven for 10 minutes. Then place under broiler to finish. Sticks are finished when the edges turn golden brown and cheese just begins to ooze at the seams. Allow to cool for at least 5 minutes before serving. Serve with a marinara dipping sauce.

Source: Taste of Home

This recipe is shared with Melt in Your Mouth Monday, Craft-O-Maniac, On the Menu Monday, Recipe Sharing Monday, Made by You Monday, Tuesday Talent Show, This Chick Cooks, Full Plate Thursday, Foodie Friday, Sweets for a Saturday

Tuesday, October 18, 2011

Malted Chocolate Chip Cookies


I have been baking chocolate chip cookies since forever. My brother and I used to be in charge of making the annual toll house Christmas cookies. We'd make huge double batches, although almost as much cookie dough would wind up inside our mouths as on the baking trays. Not that I eat the dough anymore. Well, maybe a pinch here and there. But I'm mostly reformed, and isn't that what counts?

When I saw these cookies on the Pioneer Woman's new cooking show, I knew I had to try them. I love everything malt. As it turns out, these cookies don't have an overwhelming malty taste. You do get a hint of it, but I doubt you'd notice it without being told it's in there. Or maybe my palette is just not refined enough. In any case, these cookies are still worth making. I love how thin and chewy they are. The only change I made to the original recipe was to use semi-sweet chips instead of milk chocolate chips. To me, a chocolate chip cookie needs a semi-sweet morsel to be complete.


MALTED CHOCOLATE CHIP COOKIES

2 c all-purpose flour
1 1/4 tsp baking soda
1 1/4 tsp salt
1 c (2 sticks) unsalted butter, softened
3/4 c light brown sugar
3/4 c sugar
2 eggs
2 tsp vanilla extract
1/2 c, rounded, malted milk powder
1 12oz bag semi-sweet chocolate chips

1. Preheat oven to 375 degrees. Line cookie sheets with parchment paper.

2. Stir together flour, baking soda, and salt. Set aside.

3. Cream together the butter and sugars until fluffy. Beat in eggs, one at a time. Beat in vanilla and malted milk powder. Add in dry ingredients and mix until just combined. Stir in chocolate chips.

4. Spoon cookie dough onto prepared sheets, leaving plenty of room between each dough ball. These cookies spread quite a bit. Bake for about 10 minutes. Allow cookies to rest on sheet for a minute or two before transferring to a wire rack to cool. Makes about 4 dozen cookies.

Source: Pioneer Woman

This recipe is shared with Melt in Your Mouth Monday, Craft-O-Maniac, On the Menu Monday, Recipe Sharing Monday, Made by You Monday, Tuesday Talent Show, This Chick Cooks, Full Plate Thursday, Foodie Friday, Sweets for a Saturday

Saturday, October 15, 2011

Slow-Cooker Jambalaya


I inherited a love of Cajun food from my Dad. Not that he is at all Cajun. He just likes the food. New Orleans is one of my parents' favorite destination spots, and they've vacationed there several times. I've never been, but maybe someday. Until then, I can bring the Big Easy to me with this jambalaya.

I'm always happy to find a slow-cooker recipe I enjoy. I'm not a huge fan of what crockpots do to most proteins, chicken in particular, but this recipe works out great. I'm not accustomed to a ton of spice, and this was just on the side of being too much for me. I might halve the spices next time and go from there. Also be sure to keep the rice separate for storing left overs, otherwise it'll suck up all the broth. Ask me how I know.

EDIT (9/19/13)- First, thank you to everyone who has made this my most viewed recipe, and has circulated it around Pinterest! I love seeing it still pop up there still to this day. There have been many comments about the categorizing of this recipe as a true Jambalaya. Some of you feel very strongly about this (some so strong I had to delete a few nasty comments-- come on, folks, perspective). Adding the rice straight into the crock pot and allowing it to cook there for about two hours before serving should solve this issue for those who like this drier. I personally like it with a more stew-like consistency, but I'm from Philadelphia-- what do I know? :)

SLOW COOKER JAMBALAYA

1 lb skinless, boneless chicken breast, cut up into small pieces
1 lb andouille sausage, sliced
1 28oz can diced tomatoes with juice
1 large onion, chopped
1 large green bell pepper, chopped
1 c chopped celery
1 c chicken broth
2 tsp dried oregano
2 tsp dried parsley
2 tsp Cajun seasoning
1 tsp cayenne pepper
1/2 tsp dried thyme
1 c instant rice

1. Place all ingredients except rice in slow cooker. Cook on low for 7-8 hours, or on high for 3-4 hours.

2. Cook rice according to package instructions. Add rice, as desired, into each individual serving of jambalaya. Store rice separately from rest of stew.

Source: Allrecipes

This recipe is shared with Melt in Your Mouth Monday, Craft-O-Maniac, On the Menu Monday, Recipe Sharing Monday, Made by You Monday, Tuesday Talent Show, This Chick Cooks, Full Plate Thursday, Foodie Friday, Sweets for a Saturday

Wednesday, October 12, 2011

Nutella Scones


This is another recipe I was inspired to bring to you through the wonders of Pinterest. Not because this recipe came to me through Pinterest; it's from one of my favorite cookbooks, Baked Explorations. But because my pin board has made it clear that Nutella is all the rage. Remember those commercials about how Nutella was a healthy part of breakfast because it was made with skim milk and a "hint" of cocoa? Most of us know that Nutella is more like chocolate with a hint of something else (and who cares about what that something else is when there's chocolate to focus on!). Those commercials seemed ridiculous. Yet, that's about the time Nutella recipes started popping up all over the place. Hmm... maybe that was the goal all along. Pretty sneaky, Nutella.

So how many times can I use the word Nutella in one paragraph? A bunch, apparently!

Making these scones, I did have to make a change to the original recipe. My dough was too dry and would not come together. I added an extra 1/4 cup cream, and it worked like a charm. After doing some research, I discovered other cooks made the same change, and so I feel confident enough in it to write this change into the recipe. I also ignored all warnings about overworking the dough and went to town with my kneading. These scones needed it.

The end results were very tasty. They had the richness of chocolate but restrained from being too sweet. I enjoyed the hazelnuts, but think it would be equally good without them. These scones are definitely on the larger size. I don't know that you'd get too many complaints about that, though!

NUTELLA SCONES

2 c all-purpose flour
1/4 c sugar
1/4 c dutch process cocoa powder
1 tbsp baking powder
1/2 tsp salt
6 tbsp unsalted butter, cut into cubes and chilled
1 egg
3/4 c heavy cream
3/4 c hazelnuts, chopped
1/2 c Nutella

1. Preheat oven to 375 degrees. Line a baking sheet with parchment paper.

2. In a large bowl, combine flour, sugar, cocoa powder, baking powder, and salt. Using a pastry blender, cut the butter into the dry ingredients until you achieve pea-sized crumbles. In a small bowl, whisk together egg and cream. Pour into the flour mixture. Using a spatchula or fork, start to work the wet into the dry, getting the dough to start to come together. Add in the hazelnuts. Once the dough has come together, knead it a few turns.

3. Shape dough into a rectangle, about 6 by 12 inches. Spread 1/4 c Nutella on the dough. Roll up the dough along the long side. Stand dough roll on one of it's ends and then squish it down to form a disk. You will probably get Nutella on your hands during this step. Try to power through. Cut the disk into eight wedges, placing each wedge on the lined baking sheet.

4. Bake for about 20 minutes. Allow scones to cool on a wire rack. Once cool, drizzle the tops with the remaining 1/4 c Nutella (microwave for a few seconds first to get a more drizzly consistency).

This recipe is shared with Melt in Your Mouth Monday, Craft-O-Maniac, On the Menu Monday, Recipe Sharing Monday, Made by You Monday, Tuesday Talent Show, This Chick Cooks, Full Plate Thursday, Foodie Friday, Sweets for a Saturday

Sunday, October 9, 2011

Mini Pies!


Yes, the title of this recipe needed the exclamation point at the end, because this is such a cute and fun recipe. These mini pies are the perfect little treat for the upcoming holiday season.

These actually started as a recipe malfunction. I was attempting to make pie pops for a friend's baby shower, but I could not get them to stay on their sticks. No matter what I tried, nothing worked. In frustration, I pulled out all the sticks and it clicked in my mind that I didn't need them. The concept behind the mini pie (or baby pie as the case might be) was cute enough on its own. Also, once I ditched the popsicle idea, I solved the potential problem of ladies' dresses getting ruined by blueberry filling. As it turns out, pie is easier and cleaner to eat when not held vertically on a stick. Go figure.

As I've mentioned before, I hate pie crust. Every year at Thanksgiving, we have one dessert at the table for "the people who don't like pie," which is code for Abby. I'm very lucky to have a family that appreciates my quirks. The reason I've never liked pie crust is that all the ones I've ever eaten tasted like chalk. From my perspective, to make a pie was to take a perfectly good filling and ruin it.

Well, I think I'm going to have to eat my words on pie, and I have Kelsey Nixon to thank for it. Her show, Kelsey's Essentials, is what inspired me to make mini pies. I always taste whatever I make before serving it to someone else, and when I tested these before the baby shower, I had a revelation. I like pie. If it's made with a butter crust, like these mini pies are. I asked around and discovered that all the pies I'd been eating were made with vegetable shortening. The butter in the crust makes all the difference. Instead of tasting dull and pasty, the butter crust tastes sweet and complements the filling perfectly. Thank you, butter, for being amazing.

One of the best things about these mini pies is how creative you can be with them. I used fruit fillings for mine, but you could fill them with Nutella, a cinnamon mixture, pumpkin, a nut mixture, or even something savory. No matter what filling you chose, these will be a huge hit whenever you serve them.


MINI PIES

1 1/2 c all-purpose flour
1/2 tsp salt
3/4 c (1 1/2 sticks) unsalted butter, cubed and chilled
4-6 tbsp ice water
1 egg, beaten
turbinado sugar
filling of your choice

1. In a large bowl, combine flour and salt. Add in the butter and quickly work it into the flour using a pasty blender. Blend until you've achieved pea sized crumbles. Add 4 tbsp ice water and, using a fork, bring together dough. If needed, add some more water. Shape dough into a small disk and wrap in saran wrap. Refrigerate for at least half an hour.

2. Preheat oven to 375 degrees. Line a baking sheet with parchment paper.

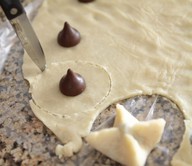
3. On a floured surface, roll out pie dough until it's about 1/8" thick. Using a 2 1/2 inch (or similar sized) round cookie cutter, cut all the rounds you can from the dough. Gather dough and roll out again and cut rounds. Repeat this until you've cut all the rounds you can, trying to get an even number.

4. Place half of the rounds on the prepared baking sheet. These don't spread, so don't worry about placing them too close together. Spoon a small amount of filling into the center of each round. Cover filling with one of the remaining pie dough circles. Using a fork, crimp together the edges of the mini pies.

5. With a pastry brush, coat the tops of each pie with the beaten egg. Sprinkle on the turbinado sugar. With a paring knife, cut three small vents on the top of each pie. Bake until golden, about 20 minutes. Transfer to a wire rack to cool. Makes about 12-16 mini pies depending on the size of your cutter.

Tips if using a canned fruit filling: Use a pair of kitchen scissors to cut up large chunks of fruit into smaller bits that will more easily fit in your mini pie. For a juicy filling, like blueberry or cherry, strain the filling using a fine mesh strainer. Run a rubber spatula along the outside of the strainer to draw the gooey part of the filling away from the fruit. Too much liquid in the filling will cause the mini pie to burst at the seam and leak all over the place. A little bit of leaking at the sides is not bad as long as most of the pie stays together.

This recipe is shared with Melt in Your Mouth Monday, Craft-O-Maniac, On the Menu Monday, Recipe Sharing Monday, Made by You Monday, Tuesday Talent Show, This Chick Cooks, Full Plate Thursday, Foodie Friday, Sweets for a Saturday

Thursday, October 6, 2011

Pumpkin Spice Cupcakes


I made these along with the Apple Harvest Cupcakes I posted about earlier this week. It's no coincidence that both cupcakes are topped with the same delicious cream cheese icing. I didn't have time to both bake and ice the cupcakes the day of the event. I wound up baking them the night before and then frosting them the next morning. Making one large batch of icing saved me time over making two different buttercreams. And a couple of people at the luncheon declared it the best icing they'd ever had, so apparently I made a wise choice. Sure, it could have all been exaggerated flattery, but, hey, I'll take it!


PUMPKIN SPICE CUPCAKES

for the cupcakes:
2 1/3 c all-purpose flour
2 1/2 tsp baking powder
1 1/2 tsp pumpkin pie spice
1/2 tsp salt
1 c (2 sticks) unsalted butter, softened
1 1/4 c sugar
3 eggs
1 c pumpkin puree
1 tsp vanilla
1/2 c milk

for the icing:
1 c (2 sticks) unsalted butter, softened
4 oz cream cheese, softened
1 lb powdered sugar
1 tbsp vanilla

1. Preheat oven to 350 degrees. Line 24 muffin cups with cupcake liners.

2. In a bowl, sift together flour, baking powder, pumpkin pie spice, and salt. Set aside.

3. Cream together butter and sugar until light and fluffy. Beat in eggs, one at a time. Beat in pumpkin puree and vanilla. Add 1/3 of the flour mixture and mix just to combine. Then add 1/3 of the milk and mix to combine. Continue alternating between batches of flour mixture and milk until all ingredients are incorporated.

4. Spoon batter into cupcake liners, filling each about 2/3 of the way. Bake for 20-25 minutes, or until a toothpick comes out clean. Allow cupcakes to cool on a wire rack before icing.

5. To make the frosting: beat together the butter and cream cheese, then beat in powdered sugar and vanilla. Spread onto cupcakes with a spatula or use a pastry bag and tip.

This recipe is shared with Melt in Your Mouth Monday, Craft-O-Maniac, On the Menu Monday, Recipe Sharing Monday, Made by You Monday, Tuesday Talent Show, This Chick Cooks, Full Plate Thursday, Foodie Friday, Sweets for a Saturday

Tuesday, October 4, 2011

Homestyle Fries


I might not be a meat and potatoes kind of girl, but put a french fry in front of me I will eat it. I probably should feel some shame about this, but I don't. I've excused myself on the grounds that I don't like potatoes any other way. Cut it into a chip or mash it, and suddenly I'm no longer interested. French fries are my one starchy weakness.

I came up with this recipe for Homestyle Fries as a way to recreate my love for fried potatoes in a way that is healthier for me. Also, it involves no piping-hot oil, which is always a bonus.

There are many things to love about this recipe. You can prepare these in minutes, and they can bake at whatever temperature you need them to. It's hard to ruin a potato. These can be served alongside a burger, but they are equally appropriate on the side of some scrambled eggs. Most important of all, these potatoes are super yummy. They develop that all important firm on the outside and soft on the inside texture. And the dried thyme provides the perfect bit of seasoning for the red potatoes.


HOMESTYLE FRIES

1 lb red potatoes
1 tbsp extra virgin olive oil
1/2 tsp kosher salt
1/4 tsp black pepper
1/4 tsp dried thyme

1. Preheat oven to 450 degrees. Note: I often bake mine at 350 because of other things I'm baking at the same time. I add an extra 20 minutes to the baking time and finish them off under the broiler.

2. Scrub and then pat dry the red potatoes. Dice them. In a large bowl, toss with olive oil, salt, pepper, and thyme. Spread potatoes out on a large baking sheet.

3. Bake for about 25 minutes.

This recipe is shared with Melt in Your Mouth Monday, Craft-O-Maniac, On the Menu Monday, Recipe Sharing Monday, Made by You Monday, Tuesday Talent Show, This Chick Cooks, Full Plate Thursday, Foodie Friday, Sweets for a Saturday

Sunday, October 2, 2011

Apple Harvest Cupcakes


As I've mentioned before, I do a bit of catering. Right now, it's mostly through word of mouth. One day, I'll make up some business cards, complete my website, and go legit. But this works for right now.

I made these cupcakes for a luncheon honoring a group of hard-working volunteers. The hostess of the event had her home decorated in an Autumn theme, so I figured cupcakes inspired by fall flavors were the way to go. And what says fall like apples?

When I came across this recipe, I was unconvinced. There is no butter in these cupcakes. I'm so accustomed to using butter, and usually quite a bit of it, in my baking, that the idea made me a bit uneasy. But I'm glad I worked through my hesitations and gave these a try.

One of the risks of making a cupcake like this is winding up with a muffin covered in frosting as opposed to a true cupcake. These definitely pass the true cupcake test. One thing these cupcakes didn't excel at was tasting like apple. Don't get me wrong, the apple taste is there. However, one or two people mistook them for a carrot or spice cake, and I can see how they'd make the mistake. Eat enough Autumn-inspired goodies with the same spices in them, and it can get a bit muddled. One way to fix this for the apple lovers out there: increase the chopped apple by 1/2 c and decrease the walnut by 1/2 c.

I got the recipe for these cupcakes from the sensational Betty Crocker's Big Book of Cupcakes and the recipe for the cream cheese frosting from Buttercream Bakehouse.


APPLE HARVEST CUPCAKES

for the cupcakes:
1 1/2 c sugar
1 c vegetable oil
3 eggs
2 c all-purpose flour
2 tsp cinnamon
1 tsp baking soda
1 tsp vanilla
1/2 c salt
3 c chopped tart apples (like Granny Smith)
1 c chopped walnuts

for the icing:
1 c (2 sticks) unsalted butter, softened
4 oz cream cheese, softened
1 lb powdered sugar
1 tbsp vanilla extract

1. Preheat oven to 350 degrees. Line 24 muffin cups with cupcake liners.

2. In a large bowl, beat together sugar, vegetable oil and eggs. Add in the flour, cinnamon, baking soda, vanilla and salt. Mix until combined. Stir in the chopped apple and walnuts by hand. Spoon batter into cupcake liners, filling each one about 2/3 full.

3. Bake for about 30 minutes, or until a toothpick inserted into a cupcake in the middle of each pan comes out clean. Let cool on a wire rack completely before frosting.

4. To make the frosting: beat together the butter and cream cheese, then beat in powdered sugar and vanilla. Spread onto cupcakes with a spatula or use a pastry bag and tip.

This recipe is shared with Melt in Your Mouth Monday, Craft-O-Maniac, On the Menu Monday, Recipe Sharing Monday, Made by You Monday, Tuesday Talent Show, This Chick Cooks, Full Plate Thursday, Foodie Friday, Sweets for a Saturday